Wooden Chandelier

Chandelier

It was with some apprehension that I took my first trip from North Carolina to Europe last spring. The plane trip was lengthy but soon after the arrival I was amazed by my surroundings and quickly immersed myself in the new environment – efficient trains, smaller stone roads, fast little cars, drivers that blow their horns at almost anything and the beauty of the countryside. It also didn’t take long for me to discover the grandeur of the old architecture and quality of craftsmanship. These are things that you can’t really fathom from pictures, they have to be experienced.

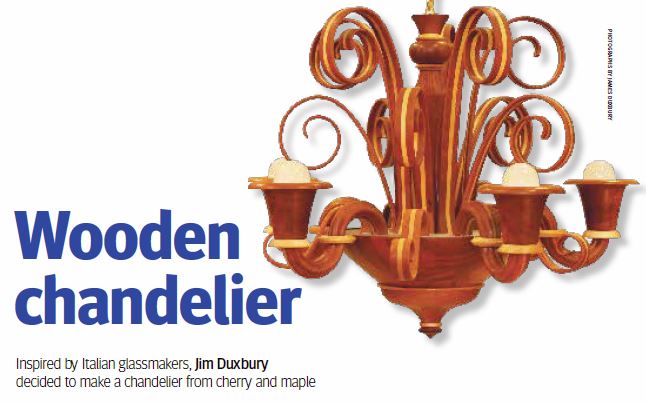
One of the highlights of the holiday was a short trip to the island of Murano, about one mile off the coast of Venice, where local glassmakers have been blowing glass and creating glass art objects for over a thousand years. Tens of thousands of unique glass pieces are on display in all shapes, sizes, colours and prices. The handcrafted designs of delicate glass chandeliers were beautiful and totally impressed me. Could that be my next challenge? A turned  wooden chandelier? This would require precision turning, which is exactly the type of project that I enjoy.

In woodturning, two styles seem to emerge: artistic freestyle and precision. In ‘artistic’, one begins with a block of wood mounted on the lathe and a ‘one-of-a-kind’ piece is created. This process does not require measurements, instead the piece develops as the wood is turned away and the turner has the liberty to change shapes as desired. Mistakes, glitches and second tries are usually not a problem and are often a design opportunity. In ‘precision turning’ this is not an option. When the block is mounted in the lathe, the exact form of the finished piece is already known.

In most cases a dimensioned drawing has been made and multiple pieces can be turned from it. Every piece must match, so should there be a defect in the wood or the turning of it, a new piece has to be made. Although my signature pieces – custom wooden kaleidoscopes – are precision turnings, a chandelier constructed of wood would be my next big endeavour, and the advent of cool LED bulbs made it totally possible. The remainder of the holiday continued to open my eyes to the talents and craftsmanship of the ancient world, but my thoughts kept coming back to those chandeliers – those beautiful chandeliers! On the plane home I sketched out some designs and by the time we landed, most of the basic details of this new creation were already on paper. In this article, I will show you how to go about making your own version.

Click below to download the full article in PDF format:

Wooden Chandelier

Burning Wire Tool

Burning Wire Tool

You do not have to play guitar to use the strings. Steel guitar strings make excellent burning wires for adding decorative black lines around your turnings. You can buy them as individual strings or in sets of six that include different wire gauges. But even better than purchasing them, you may know a guitar player who is willing to give you used strings that have been retired. From each guitar string, you will get about two good lengths of burning wire, and they last a long time.

Click below to download the full article in PDF format:

Burning Wires


Trash to Treasures

Jars


This basic turning project recycles interesting little jars and bottles that normally would be discarded, making them into one-of-a-kind custom gift items. It is also a great use for all those little scrap pieces of contrasting wood that seem to accumulate, but you just can’t throw away. I have made many of these beautiful wooden lidded jars; they are a big hit and are often used more as a decorative item than as a functional jar. We have been known to eat some very strange kinds of jams, pickles, relishes, and who knows what else just to get that specially shaped little vessel (see Fig. 1).

Transforming uniquely shaped containers by adding wooden lids is not a new idea by any means. Years ago, a variation of this sort of lidded container project was presented by the well-known woodturner Ernie Conover, who has written many articles (see Woodturning Issue 17, 68  Woodturning Design December 2013 Trash to Treasures Woodturning Design Project by James Duxbury Wooden-Topped Jars November 1993). And in the previous issue of Woodturning Design (#45), Scott Roberts explained how to cap ordinary plastic water bottles with wooden tops made from scrap.

Click below to download the full PDF article including step-by-step instructions:

Trash to Treasures

Ant Barrier

Hummingbirds have become a real summertime attraction around our house. We began with a small, single-tube feeder of the sugary fluid and have now progressed to a larger, four-hole model. It seems that the bigger the feeder, the more birds appear. They love it.

However, ants love the sweet, sugary liquid too, and in no time, find a way to get up the support pole and down into the feeder. The ants don’t eat much, but they crawl all over the feeder, getting right into the feeding tubes where they drown by the hundreds, contaminating the liquid and plugging the tubes. Greasing a short section of the supporting pole works well to deter the ants, but the grease dries out in a few weeks and becomes a real mess after a few applications.

Over the years, I have seen a few wishing well-style ant barriers turned out of wood, but never paid too much attention to them. Most are filled with cooking oil and hang between the support pole and the feeder, creating a moat of oil that the ants can’t get through. There are two problems with this system: First, wood that is outdoors does not hold up well no matter what the coating is; and second, over time, the oil soaks out through the thin wall of the wooden moat. Also, both of these conditions are exaggerated when the feeder is hung out in full sun, as is often the case. Analyzing the problem, the design is good, but the material failed. Here is where we can utilize the concept of “going green” with recycled plastics to solve both of these problems.

Click below to download the entire article showing detailed step-by-step instructions:

Ant Barrier